Friday, March 25, 2016

Orange Jelly


Easter is this Sunday! Do you still have things to prep for your Easter dinner?? Are your desserts and snacks all planned and done?? Do you have lots of goodies for the children in your family? 


Here is a quick dessert that kids and grown-ups alike can enjoy! It is quick and easy to put together and can be made 3-4 days ahead of the party so that you don't have to scramble along at the last minute!


You can make this for your children or any kiddie party anytime! My kids love it, I am sure yours will do too!  If you like jelly-desserts, also check this Stained Glass Cake, if you haven't done so already!


I am bringing these beauties to Throwback Thursday # 31 and Angie's Fiesta Friday #112!! Angie's co-hosts this week are Natalie @ Kitchen, Uncorked and Hilda @ Along The Grapevine.

Servings: 4-6 (2 segments per person)


Ingredients:


Orange: 2 big ones. ( any variety will do)
Orange Jelly: 1 packet ( any brand will do). For vegan options, use China Grass / agar agar jelly.
Water: 1 cup

Method:


Cut the orange in the center into two equal hemispheres. Scoop out the orange segments and keep aside. Do the same with the other orange.

Well, you could eat the pulp if you wish. Alternatively, you can squeeze the orange juice and remove the leftover pulp. Keep aside the empty orange skin ( that is now like a cup).

Boil one cup water. Dissolve the orange jelly into it. Keep stirring until the jelly melts completely in the water.

Arrange the empty orange cups in a tray/ container so that they can stay upright and stable. Pour the prepared jelly mixture into the cups until 3/4 full.You may have leftover jelly. You can use another orange cup or a regular bowl.

Place the tray in the refrigerator to set. Gelatin takes 3-4 hours to set while china grass ( agar-agar) takes only an hour.

Once the jelly is firm, remove it out from the refrigerator and slice the orange cups into 4 segments/ sections.

You can also slice it just before serving.


Keep it refrigerated until ready to serve.

Serve chilled!

Cooking made easy:


The trick to making firm jelly is by reducing the amount of water/ fluid used to mix the powder in. Always use less than the recommended amount. The amount of fluid used depends on how firm you want the jelly to be.

Tip for healthy living:


Make desserts healthier by combining them with fruits.This trick also works to get your children to eat healthy. Allow them a small serving of unhealthy food/snack items only if they eat healthy ones first. Then, it is a win-win situation! This works with my kids.


Food for thought:


Nature does not hurry, yet everything is accomplished. Lao Tzu


Please do share your thoughts. Your opinion matters!

Monday, March 21, 2016

Paanak ( a refreshing, thirst-quencher).


Paanak is a traditional non-alcoholic beverage from my hometown. When someone mentions Paanak, it immediately brings to mind the picture of people playing with colors , squirting water-guns filled with colorful water at each other and basically drenching them. It is all in the spirit of camaraderie. Paanak is served to all the festivity revelers and the spectators standing in the hot sun. Paanak not only is refreshing and quenches the thirst, it is also rejuvenating! The jaggery in Paanak helps counteract hypoglycemia ( decreased blood sugar levels).


Holi is a festival of colors that is mainly celebrated in Northern part of India. Where I come from, which is the South Kanara region of Southern India, we have a similar festival of colors celebrated on the sixth day of Theru/Rathasaptami ( Chariot festival). The concept for both is the same!

Courtesy: Kannada Gotthilla ( facebook)

I therefore figured that this is a great recipe to share with all my North Indian friends! This is a jaggery -based drink that has the goodness of  lemon juice, ginger, cardamom and black pepper, making it also a great digestive aid for all the indulgence in rich food and desserts! It is very simple and easy to make!  Do try it. It is perfect also to sit at the beach and drink!


I am bringing these beauties to Throwback Thursday # 31 and Angie's Fiesta Friday #112!! Angie's co-hosts this week are Natalie @ Kitchen, Uncorked and Hilda @ Along The Grapevine.

Servings: makes three  5 oz glasses.


Ingredients:


Water: 2 cups
Ice cubes: 6-8 nos
Lime/lemon juice: from one small lime/lemon.
Jaggery: 3/4 cup, grated ( can be adjusted as per individual desired level of sweetness).
Ginger: 2 inch piece, grated
Freshly ground black pepper powder : 1/2 tsp
Cardamom powder: ground from  seeds from 2 pods ( around 1/4 tsp)

Method:


Add all the above ingredients to a blender . Pulse for 5-10 seconds!

Alternatively, add all the ingredients to a big pot. Mix well.

Serve chilled!

Enjoy!


Cooking made easy:


You could use ginger powder instead of grated ginger.

Ready-to-use cardamom and pepper powders and lemon juice concentrate can be used.

Sugar or honey can be used instead of jaggery.


Tip for healthy living:


Jaggery is a healthy alternative to sugar for most of our daily needs including coffee and tea.It is not processed. It is basically sugarcane juice that has been boiled and reduced. It is rich in iron.

Food for thought:


The face is the mirror of the mind, and the eyes without speaking confess the secrets of the heart. St. Jerome
Please do share your thoughts. Your opinion matters!

Friday, March 18, 2016

Stained Glass Cake


This year the Indian festival of colors, Holi and the Catholic festival of Easter are both being celebrated the same weekend. At all these celebrations,  the ones  who have the most fun are children. Here is a dessert that is colorful and something that both kids and adults will enjoy alike. It is very easy to make and perfect for hot weathers. 


It can be made with jello and for the vegetarian version with China grass ( agar agar)jelly. The China Grass version is much quicker as it takes only an hour to set in the refrigerator. The best part, it can even set at room temperature! How cool is that! I have used water instead of milk and have used 1/3 rd the recommended quantity.

I am bringing this to my dear friend Sonal's Holi Collective. She is such a sweetheart who puts so much effort on behalf of all of us!


Servings: 8-10


Ingredients:


Red jelly: 1 box
Purple jelly: 1 box
Pink jelly: 1 box
Plain china grass: 1 box
Condensed milk: one 8 oz can
Milk: 1/2 cup
Hot water: 3 1/2 cups
Vanilla essence: 1 tsp
Strawberries :3-4, sliced for garnishing.( optional)
Blueberries : 3-4 for garnish ( optional).

Method:


Dissolve red colored jelly powder in 1 cup hot water. Stir until the powder has completely dissolved, around 2 minutes. Pour into a bowl and refrigerate it until it solidifies, around   1 hour.

Repeat this with the other two colors.


Once all the colored jellies are solid, start with the next step.

Remove the jellies from their individual mould. Chop them into big chunks.


Add these chunks to the silicone Bundt pan.

Mix one packet of plain china grass in 1/2 cup water in a saucepan. Boil it until the china grass is completely dissolved. To this add the condensed milk, vanilla and mix very well. Let it cool down slightly.


Pour the cooled mixture into the Bundt pan on top of the colored chunks of jelly.


Refrigerate the pan until the mixture has solidified, around 1-2 hours.

Take the Bundt pan out. Place the serving plate on top of the pan . Now overturn the pan so that the cake is on the plate.


Picture from inside the fridge!:)


Garnish with strawberries and blueberries.


Keep it refrigerated until ready to serve.


Slice and serve.


Enjoy.

I am also bringing this to Throwback Thursday # 30Fiesta Friday#111 and Saucy Saturdays. Angies's co-hosts this week are Naina @ Spice in the City and Julianna @ Foodie On Board.

Cooking made easy:


You can choose what colors you want to use in this cake. I only had the colors I mentioned. You can decorate with any fruits of your choice or depending on what is available. You can even serve it with fruits. Perfect for kids.

If you don't have China grass jellies, use Jello if you don't mind the presence of gelatin in it . The important thing to remember is to reduce the amount of water used. Use 1/3 rd the recommended quantity of water. Use only hot water.

Tip for healthy living:


Gelatin is made up of powdered animal skeleton, amongst other things. Gelatin is a protein obtained by boiling skin, tendons, ligaments, and/or bones with water. It is usually obtained from cows or pigs. Gelatin is used in shampoos, face masks, and other cosmetics; as a thickener for fruit gelatins and puddings (such as Jell-O); in candies, marshmallows, cakes, ice cream, and yogurts. Gelatin is not vegetarian or vegan. Agar agar is a good alternative for gelatin as it is made from seaweed. It sets faster and can even set at room temperature. Carrigean gum is another vegan alternative. 

References:
http://www.peta.org/about-peta/faq/what-is-gelatin-made-of/
http://www.peta.org/living/food/gelatin-alternatives/
http://www.thekitchn.com/vegetarian-and-vegan-substitutes-for-gelatin-tips-from-the-kitchn-189478


Food for thought:


We can believe what we choose. We are answerable for what we choose to believe. John Henry Newman


Please do share your thoughts. Your opinion matters!

Wednesday, March 16, 2016

Kulith Kosumbari ( Horse-gram salad); Diabetes Friendly Thursdays


It is that time of the month again when we bring to you very healthy, diabetic-friendly and weight-watcher friendly recipes. What's with the "weight-watcher" thing?? Well, studies have shown that obesity is the root cause for so many of the chronic health conditions, namely Type II diabetes, heart conditions and stroke. Obesity in-turn is the result of mainly poor eating habits and a sedentary lifestyle. Now, we can't give up eating! But we can definitely eat healthier and make lifestyle changes towards the same.

March is the month of start of Spring, cleansing of house and yards, discarding the old and welcoming the new. Lets begin the onset of spring with some healthy PROTEIN PACKED SALADS.


                      Creating Recipes with a Cause! I am a proud DFT blogger. 
                                        To learn about DFT, Read this Link
                                        To view more DFT recipes, Click here!

When salads are mentioned, most people feel like they are deprived of food or have to eat only greens ( ghass-phuss) and therefore won't feel full. Those are myths. Salads can be made filling and may not necessarily contain greens. Some people, especially Indians have reservations about eating raw food, as in Ayurveda it is believed that raw food can put a strain on your gastrointestinal system. That too can be addressed by using only those vegetables that are usually not cooked , like cucumbers and tomatoes.


For diabetics, it is strongly suggested to reduce the amount of  carbohydrate in their diet, especially at night.  This leaves them feeling hungry. A protein-packed small meal is a perfect solution for this. Today, I am sharing with you Kulith Kosumbari. "Kulith", also known as Kulthi or Hurali is horse-gram and Kosumbari means salad in Indian language.  Kulith or Horse-gram is extremely nutritious and protein-packed. Apparently, this particular bean is fed to the horses to make them strong. You can read more in "footnotes" below. To multiply the nutritional benefits, I have sprouted the horse-gram. You do not need to. It is optional. If you do want to sprout it, just soak it in water for 4-5 hours. Then drain it completely. Cover the container with a moist cheese cloth or paper-towel and keep in a warm place for a day or two. You will see the sprouts.


The horse gram used in this recipe is fully cooked until al-dente. I have to proudly admit that this is one of my ingenious recipes.I hope you guys like it and can incorporate it into your everyday diet. It is also an "oil-free " salad, but you may temper mustard seeds and curry leaves and season it with it if you wish. It is flavorful and delicious even without  the addition of any oil. Hard to believe, right?  This salad is good the next day and can make for a delicious-filling lunch too.


Servings: 1


Ingredients:


Kulith ( horse gram) ( soaked for 4-5 hours or sprouted) : 3/4 cup
Water: 1/2 cup to cook the Kulith
Onion: 1/4 small, chopped
Spring onion: 1, chopped
Cucumber: 1/2 of small cucumber, chopped.
Grape/ cherry tomatoes: 3 nos, halved. ( Regular tomato could be used, 1/2 small tomato, chopped).
Bell pepper ( capsicum): 1/4th of small capsicum, chopped . ( I have used green and orange colors, you can use just one color).
Green apple: 1/4 of small apple, chopped.
Coriander leaves ( cilantro): 1 tbsp, chopped.
Green chilli: 1/2 small, chopped fine ( optional, can be adjusted as per individual spice level).
Black pepper powder: a pinch.
Lemon: 1/4 lemon juice
Salt: to taste

Method:


In a saucepan, bring 1/2 cup water to a boil. Add the soaked and drained Kulith and a pinch of salt. Cook until tender enough to eat comfortably ( around 10 minutes). Turn off the flame. Drain and let it cool down completely. You can also do this ahead of time and keep it in the fridge.

In a bowl, add the chopped onion, green onion, tomatoes, cucumber, apple, green chilli & coriander leaves.

To this, add the cooked and cooled kulith. Add in the lemon juice, salt and black pepper.  Mix well.

Can be refrigerated until ready to eat.

Serve in a bowl.


Enjoy. I am bringing this to Throwback Thursday # 30, Fiesta Friday#111 and Saucy Saturdays. Angies's co-hosts this week are Naina @ Spice in the City and Julianna @ Foodie On Board.


Cooking made easy:


You could be creative and add/ remove vegetables/ fruits to this salad based on what you have on hand. You could add grated carrot, radish,raw mango or  pomegranate seeds, to name a few. You could add roasted peanuts/ walnuts for additional crunch.

Like I said earlier, you could make a tadka ( tempering) of mustard seeds and curry leaves in 1/4 tsp coconut oil and add to the salad.

Footnotes (Tip for healthy living) :


Kulith ( horse gram ) is a great source of protein for vegetarians. Like I mentioned earlier, it was used to feed horses and hence the name.It is very nutrient-dense and is rich in calcium, phosphorous, iron and protein. It is purported to boost immunity, reduce flatulence and indigestion and promote weight loss. It has been found to be beneficial in both men and women's health , helping with low sperm count and menstrual disorders. Research has shown the beneficial effects of horse gram in diabetes. Regular consumption of these beans is purported to reduce blood glucose level.High fiber content prevents constipation. 

Sprouts are very nutrient-dense and therefore provide immense health benefits. They are low in calories, rich in dietary fiber, vitamins B, C and K. It also contributes to the daily dietary intake of iron. It is of course a good source of protein for vegetarians.

We all know that veggies are packed with chock-full of vitamins.

References:


Disclaimer

I am not a nutritionist or dietician. My knowledge and information is based on my research and reading from different resources. Please consult your doctor or dietician before making any changes to your diet.


Do Check out the other DFT contributors  and their links!

Food for thought:


Without a struggle, there can be no progress. Frederick Douglass


Please do share your thoughts. Your opinion matters!

Monday, March 14, 2016

Idli and appe: One batter, two dishes! Meatless Monday.


As a working mom, I am always striving to feed my family, especially my children healthy meals. Weekends, I make it a point to make traditional breakfasts which also can become lunch items for the first couple of days of the week. Most Indian traditional breakfast items require some kind of batter to be made ahead of time and fermented. This means you have to plan ahead mid-week as to when to soak the rice and lentils and when to grind the batter and make sure there is enough time for fermentation. If I am making all this effort, I might as well make sure that I have enough for two breakfasts and many be even a few of the kiddos lunches through the week! Now obviously, nobody wants to eat the same breakfast two days in a row!! We all crave variety. So, I became creative and created variety.


My kids love idlis ( steamed rice-lentil cakes) that are usually served with sambar. When I make idli batter, I make sure that I make enough batter for two breakfasts! However the second day, instead of making idlis, I make appos ( paniyaram ) in a appe pan or ablesevier pan. Making appe is also a great use for idli/ dosa batter that has gone sour. I use the same chutney for both. You could even get creative with the appe by adding chopped onions, coriander leaves, bits of ginger and green chillies and may be even some finely chopped veggies! It comes out delicious!


Today, I am going to share the recipe for this batter and the technique for both.

You can find the recipe for the idlis here and the technique for apphere.


This is perfect for the lunch-box for the kids. You can even make mini-idlis instead of the regular big ones.

Mini-idlis with peanut chutney and blueberries


Mini-idlis with peanut chutney and blueberries


Hope this has helped you and you can come up with even more wonderful ideas!

Appe with peanut/coconut chutney and blueberries

Appe with peanut/coconut chutney and blueberries


I am bringing this to Throwback Thursday # 30, Fiesta Friday#111 and Saucy Saturdays. Angies's co-hosts this week are Naina @ Spice in the City and Julianna @ Foodie On Board.

Cooking made easy:


After making idlis, cleaning the idli mold plates can be quite a tedious task. You can make this chore easier by ensuring that you liberally grease the idli mold with butter or ghee( clarified butter), which also gives the idlis a nice flavor.

Tip for healthy living:


Giving kids home-made lunch is much healthier than pre-packaged processed stuff. Always make it a habit to include some fruit with your child's lunch.

Food for thought:


You don't know until you have tried. Suchitra


Please do share your thoughts. Your opinion matters!

Friday, March 11, 2016

Hello Kitty Cake: a chocolate cake with chocolate mousse and buttercream frosting.


This past weekend was my daughter's birthday . Her only request was that she wanted a Hello Kitty cake. I have been making her birthday cakes for the past three birthdays now. I made an Elsa cake the last year and a Barbie doll cake the year before that. This year, due to time constraints, I didn't want to make a 3-D cake and therefore decided to make a Hello Kitty face cake.


My daughter loves chocolate and so do majority of the kids. I therefore decided to make a simple chocolate cake filled with chocolate mousse. 


I chose simple buttercream frosting as I needed the frosting to be white to make the face. I used the Wilton Hello Kitty pan to make the cake. I got the chocolate recipe from a friend at one of the food groups and the buttercream recipe was from here. I am thankful to Ms. Sarita Bhat for sharing her recipe with me. This is by far the easiest chocolate cake recipe and it tasted pretty good. I was dreading piping the entire cake using a star-tip but I found it to be a breeze due to the excellent fluffy, creamy frosting. This was the best frosting I have ever made!! It was easy to work with, without hurting my hands , firmed up quickly upon placing in the refrigerator and didn't collapse after the cake was placed at room temperature. This was definitely one of the best cakes I have made in terms of ease and convenience. As for perfection, I have never claimed to be a baker and will never claim to be one! I am just a Working Mom who  tries to make her children happy and a tiny bit healthier!


Servings: 12-15 ( 2inches x 4 inches  piece).

Ingredients:


All purpose flour: 1 & 3/4 cups
Granulated sugar: 2 cups
Cocoa powder ( unsweetened): 3/4 cup ( I used Hershey's)
Baking powder: 1 & 1/2 tsp
Baking soda: 1 & 1/2 tsp
Salt: 1/2 tsp
Eggs: 2, large
Coffee/ warm water: 1 cup
Milk: 1 cup ( at room temperature)
Canola oil: 1/2 cup ( any cooking oil can be used).
Vanilla essence: 1 & 1/2 tsp

For the frosting: ( makes 4 cups)

Powdered sugar: 4 cups
Unsalted butter: 1 cup
Vanilla essence: 2 tsp
Milk/ water: 2-3 tbsp
Salt: a pinch


For the Chocolate mousse:

Semisweet chocolate chips: 1 cup
Heavy cream/ whipping cream: 1 cup

Method:

Buttercream Frosting: 


Sift the powdered sugar and keep ready.

Add the butter to the mixer bowl and cream the butter on medium setting until smooth.

Add vanilla essence and salt and beat for a minute. Add the powdered sugar 1/2 cup at a time, beating for 10 seconds after each addition.

Add milk/water 1 tbsp at a time, beating for few seconds until you have reached the desired consistency.

Take 1/2 cup of the frosting in two bowls. Add red color to one and black to the other. Mix well. Take 1/4 cup frosting and make it pink ( optional). I used this for the center of the bow as I had some leftover pink frosting. You don't have to do it.

Add it to the piping bags and keep ready. Prepare the piping bag with the white frosting as well.

You can refrigerate the frosting until ready to use.

I made the nose using yellow candies that I had leftover from a cookie-decorating kit.


The Chocolate mousse:


Take the chocolate chips in heat proof bowl.Heat the cream on the stove top until it bubbles.  Add this to the bowl containing the chocolate chips and stir well until all the chocolate had melted . The heat from the cream will melt the chocolate.
Let it cool down for until it comes to the desired consistency. I usually make mine ahead of time and leave it in the refrigerator.

You could keep it in the refrigerator for a couple of hours.

The cake board:


Place the Hello kitty pan upside down on a big piece of cardboard. Trace the outline of the pan on the cardboard. Cut the cardboard into that shape. Cover it completely with aluminum foil or any other kind of fancy foil/ material that is waterproof. Keep aside.


The cake:


Preheat the oven to 350 deg F.

Grease the Hello Kitty pan and keep ready. Cover the bottom of the pan with parchment paper.

Sift together flour, baking soda, baking powder, cocoa powder and salt. Mix the granulated sugar to this mixture.

In a separate bowl, whip the eggs. Then add the canola oil, vanilla essence, milk and coffee/water.


Add the wet ingredients to the dry ingredients. Mix well. The batter will be pretty thin. Pour the batter into the prepared pan.


Place the pan on the middle rack of the oven and bake at 350 deg F for 30 mins or until the toothpick comes out clean when inserted into the center of the cake.


Take the pan out of the oven and let the cake cool in the pan for 15-30 mins before upturning it on a cake rack. Let it cool completely ( atleast 2-3 hours) before trying to frost it.


Level the cake before frosting. 

Apply a little frosting to the center of the prepared cake board and place the leveled side of the cake on the cake board.

Using a serrated knife/ cake leveler or floss, cut the cake in the middle so as to get two equal layers. Keep the top layer aside.

Spread  the chocolate  mouse on top of bottom layer so that it forms a filling for the cake.


Place the other half of the cake on top of the mousse.

Crumb Coating: 

Apply a thin coat of the white buttercream frosting and crumb-coat the cake. Place it in the refrigerator for atleast a couple of hours ( or overnight) before decorating the cake.


Decorating the cake:


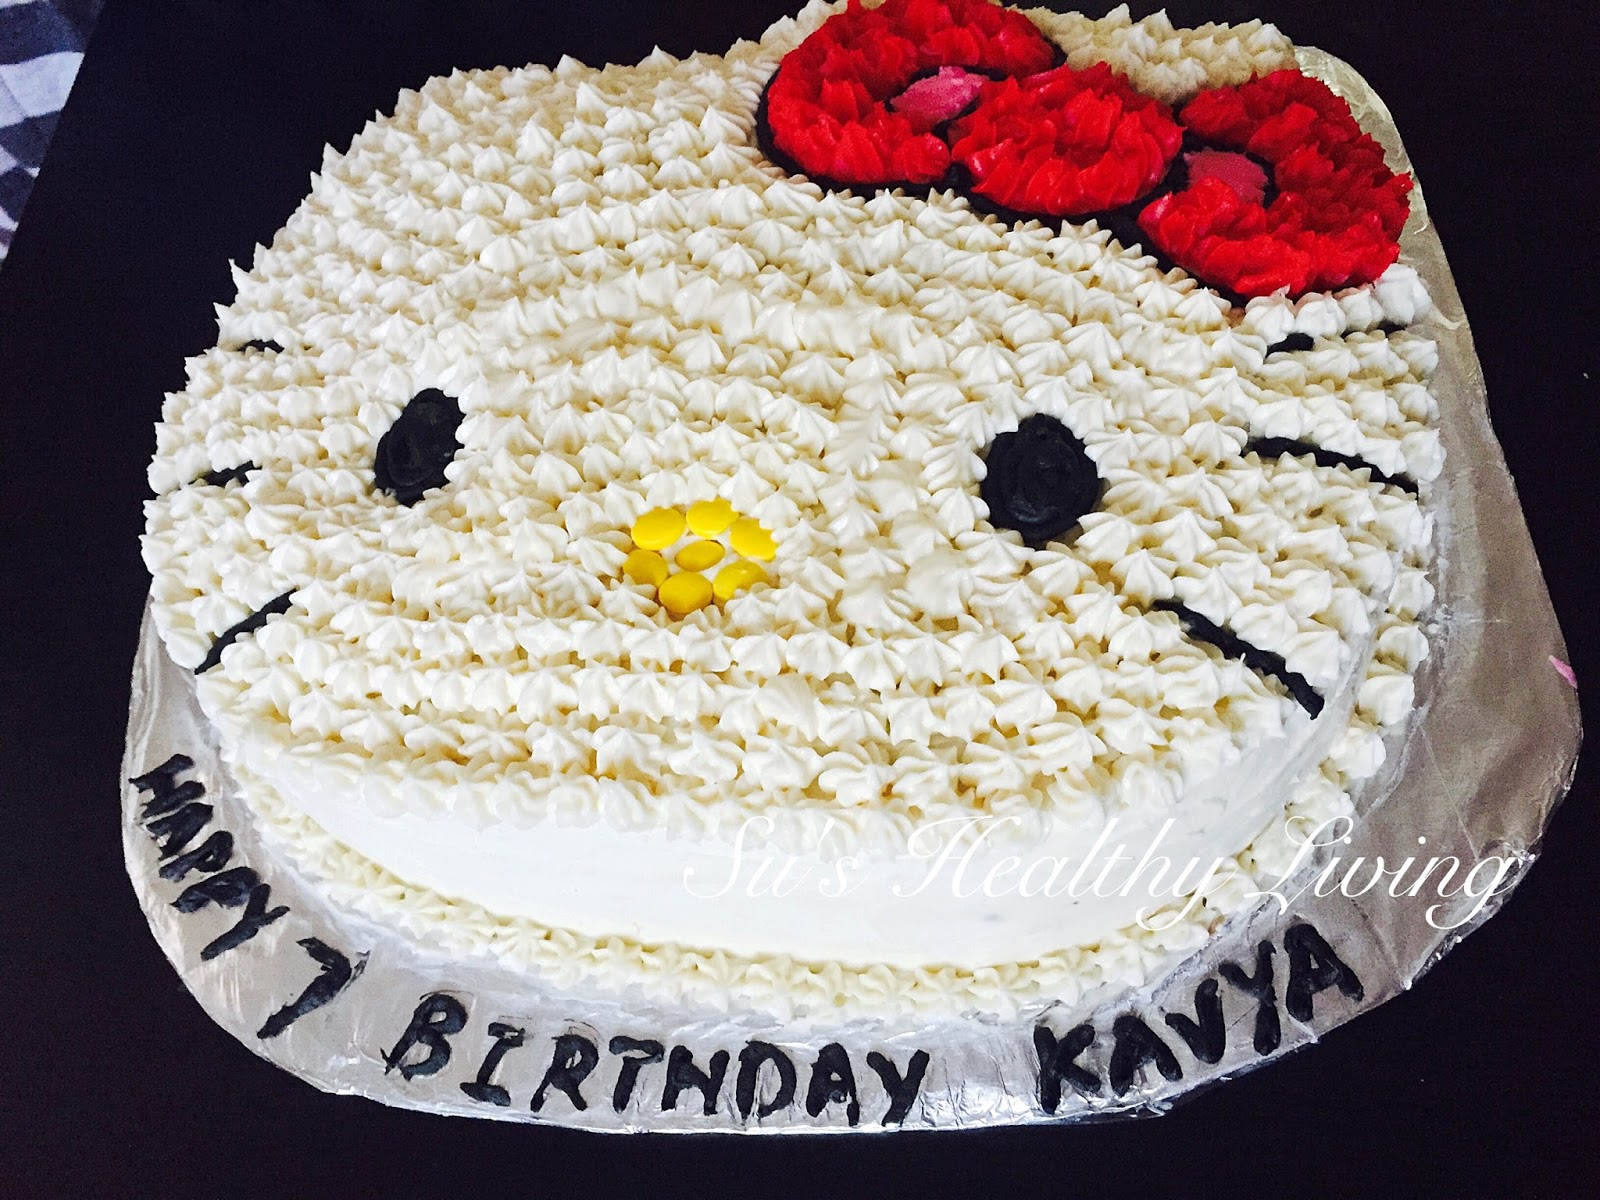
Take the cake out of the refrigerator. Using a toothpick, roughly outline the bow, the eyes, nose and whiskers.


Using an offset spatula and white frosting, frost the sides and smooth it.

Using Wilton tip # 3 draw the whiskers of the kitty with black frosting. Also fill up the eyes and make the outline of the bow.


Using the star tip # 18 an red buttercream frosting, fill in the bow, except the center of the flares of the bow which I have colored pink.


Now using the star tip #18 and the white frosting fill in the rest of the top of the cake and the bottom line on the cake board. I purposely didn't fill in the sides as firstly, I didn't want too much frosting and secondly, the stars tend to give into gravity and collapse.


I wrote the birthday message using the black frosting and tip # 3, on the cake board.

I am bringing this cake to my friends at  Throwback Thursday # 29, Angie's Fiesta Friday # 110 ,where co-hosts this week are my two dear friends Jhuls @ The Not So Creative Cook and Apsara @ Eating Well Diary. I am also bringing this to Saucy Saturdays


Cooking made easy:

If you are apprehensive about making cake from scratch, you could always use a boxed mix and make the cake. Of course, there is nothing like home-made!

If you do not have the Wilton gel colors and do not want to be bothered with preparing piping bags with colored frosting, just buy the Wilton ready-made frosting tubes that are available in a variety of colors.
For the above cake, you will need the following:
White Wilton frosting: 1 tube
Yellow Wilton frosting: 1 tube
Black Wilton frosting: 1 tube

Tip for healthy living:


The reason I like to make the desserts for my kids is because I can control what ingredients go into it. Most store-bought cakes have high-fructose corn syrup in them and the frosting is often made with shortening and not butter. My making desserts at home, I can also choose the level of sweetness that they will have.

One more important tip I would like to share is that for birthday parties, keep the cake small. While serving, cut it into small/ thin slices. Nobody really eats the entire piece of cake! It is the concept of the cake that most kids like. And of course, if anyone wants, you can always serve second helpings!

Food for thought:


It is clear gain to sacrifice pleasure in order to avoid pain. Arthur Schopenhauer


Please do share your thoughts. Your opinion matters!